Month: August 2012

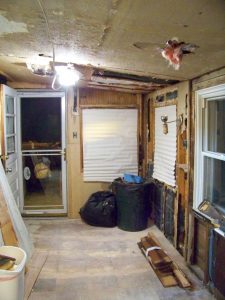
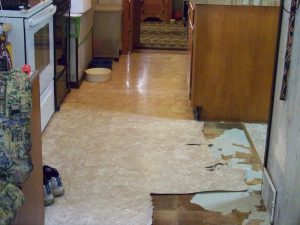
How we’re living without a kitchen

No Comments

I have been asked by a few people, how’s living without a kitchen, Jen describes it as being on an indoor camping trip, that seems to be the appropriate description.  It’s also been less than a week, so ask me in another week or 2 🙂

First thing that has made our lives much easier is the fridge with water dispenser, we were able to swing it around the wall into the dining room and leave it connected.  And the microwave is on a rolling cart.

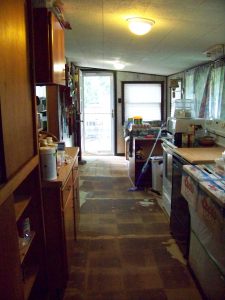
The living room is the kitchen condensed, but it’s so well organized that it doesnt feel that much smaller, we put alot of the cabinet stuff that we shouldnt need down in the basement

Coffee maker is set up in my office

Paper plates, plastic ware and red solo cups

Also, some of our favorite Take Out

Mom will be here for a few hours tomorrow, or maybe until Sunday morning, I will ask her to rate the amenities

Day 4- Deconstruction

No Comments

I am all the way down to the studs in ~75% of the ‘addition’…but at this point I can have Scott come in and pull up the flooring, we need to make it level before putting down the cement board…I’m sure this will be a fun project #sarcasm

Trash is going out tonight.  I am hoping someone stops and grabs up some of he wood, so I can put more out there

The BIG (virtual) REVEAL

No Comments

Jen here.  Our color scheme has changed a few times since the demo started.  Scott told us it would happen, and he was right. But to visualize the whole finished thing was really difficult.

What would I use to design a room?  The Sims 3 of course!  I’ve made our house many times, and you can just plop colors and textures in on a whim to see the effect in the room.

However, you’re limited on style of furniture, appliances, cabinets and window coverings.  So this model is solely for finalizing the color scheme, and envisioning the new layout.

We finally decided on medium gray floor tiles, white ikea cabinets, butcherblock countertops and a nice muted green paint on the drywalled walls.

Details we like that aren’t pictured are brushed nickel hardware on the cabinets, and we might go with nice curtains instead of bamboo blinds.  What do you think?  The eat-in breakfast nook will definitely have a different style table and chairs, but I hope to match the colors.

Day 3- Deconstruction

No Comments

Much closer to being ready for Scott, I bought us a day because I knew there was no way that I could be as far along as I would have liked to have been…we will see him tomorrow

I knew taking on this project that I would find some weird shit…and I am

many layers of floor: vinyl is all up, half-assed cabinet base is gone, in some places, I found some old tiles, not ceramic or stone…kinda like the stuff that was on the floor in elementary school, but green not grey.  There is also criss-crossed wood panels, that look like they were used as a sub-floor…

many layers of wall:  even more layers of ‘addition’, I can’t tell what was the original house and what was added on.  When I re-did the bathroom 10 years ago, I found a storm window behind the wall, so I assumed that what WAS the exterior wall at some point. If this is true, then they added on a second time.  Guess once I remove that layer, I may see the original layout

Shirl should be here later today to help rip out more, more, more

this is how it looked at the start of tonight

and how it looked at the end of the day

this isn’t all of it…but it’s SO getting there!

Day 2- Deconstruction

No Comments

So, didn’t take today off, so normal work day (and then some)

After talking with Scott yesterday about the what’s next and when, we decided that we are going to rip out the flooring in the ‘addition’ part of the kitchen.  The floor is not level, there is about an inch, inch and a half difference between walls and it’s not very sturdy…so let’s fix it, starting Wednesday.  I told him that I would be ready

Today’s todo:

The addition list

  • remove the rest of the ‘diner’
  • rip out all the walls down to the studs
  • rip out the ceiling tiles

more to come later, and pictures

Day 1- Deconstruction

No Comments

Did an hour or so of Coretel work, even taking a day off, I don’t want to drop anything that really needed to be at least touched…

Had to finish pulling everything out of the cabinets, run the dishwasher one last time and take out the trash/recycling…Jen kicked some ass!!

Scott got here just as we were breaking for lunch, but he went right to work removing the copper and sewer lines from the sink, and pulling the sink out of the countertop. And not to forget about removing the electric line for the stove.

  • All the countertops and cabinets have been removed
  • Most of the 1st and second layer of flooring have been removed
  • Some of the 1st layer of walls have been removed

each of these things had something weird happening that made us all shake our heads:

the base cabinets were sitting on a pre-made, nailed to the floor base, but not secured to each other, so once the countertop was disconnected, these cabinets just pulled right out of their slots

the flooring…this might end up being it’s own blog entry 🙂

1st layer of wall, paneling that just crumbles (makes easy to put it out in the trash), but under it, drywall that does the same thing…down to the studs we go

let’s have a BBQ…

No Comments

This is the quote that started this project…

well, if we are going to have a BBQ, I want to rip up the vinyl flooring that is slowly breaking apart where the underlayment meets…but the new flooring ideas will have to wait until after the BBQ.

well, if we are going to replace the flooring, we should probably do it right and pull up everything that we can

ok, I hate the cabinets, why dont we replace them…

let me call Scott (who I worked with for a few months on his property that Shirl needed to move in to, (before I hurt my back.))

So Scott came over Sunday morning and we discussed the options…which I am sure will change after we gut the kitchen…RIGHT AFTER THE BBQ

how I feel about the kitchen

No Comments

have I told you…I hate the cabinets in the kitchen??  looks like someone made them in jr high shop class

have I told you that I hate the flooring??  when they installed it (nice vinyl, but again, laid by a jr high student), when a crack appeared in the flooring, they would just add a room separator, thin metal strips

and the “diner”…this is what I call it, it’s a built in, (jr high school student made) breakfast nook…I have a love hate relationship with this thing…it has been a table that the kids can paint on, scratch up and generally try to ruin, many projects, coloring books and games played there. It even comes in handy when I have a BBQ, my grill is right outside the window, so I could just slide a tray of hotdogs and burgers right on to the table.  but like I said…ugly and cant do much with (but I think I will miss it, so we are going to try to find some sort of bistro set that will feel like it belongs there.

absolutely everything is out-dated, so when buying anything that needs to be replaced (fridge, stove, sink, etc) we have to keep in times with the house.  Dont want to have a thousand dollar stove that has a griddle burner, cast iron everything to put next to what I call…

the stump…wtf were they thinking??  let me see if I can describe the ‘stump’ and why I call it that.  to get in the basement, you can go down the stairs in the house, or you can go through the Belko doors…well, when the genious installed these doors, I think they cut the hole in the house, added (nicely done) stairs, but forgot they needed head room….hence, the square no usable box looking stump in the kitchen.  now, it does hold alot of plants and gives them lots of sunlight, but that’s prime real-estate.

it all started with a WISH list

No Comments

When I bought the house back in 2001, each room in the house, even the yard work  seems to have it’s own list.

My first outside list (now completed)

  • remove 40′-50′ Holly trees (you know the ones…sharp dagger thorns around every leaf) (2) from the front yard, and (1) from the back yard
  • remove the rows of bushes that ran parallel with the sidewalk (it was actually 1 overgrown bush on each side that re-rooted itself all the way down the edge of the sidewalk)
  • remove the half-assed, used to be, brick water-well decoration
  • there was also a half-assed, broken brick fire-pit that I removed from the back yard after Ridley Twp told me that it was illegal to burn!
  • ever hear of monkey-balls? well, they are the pointy golf-ball sized things that cyprus gum trees drop (all year round)…and no matter how many times you run them over with the lawn-mower, they still hurt your feet with or without shoes on. There were 2 of these trees that have been cut down and removed. I do miss the shade they provided, but I just couldn’t keep up with the clearing of the monkey-balls

My first inside list (also completed)

  • rip up the ugliest teal, from the early 60’s carpet (I was sick for 2 weeks after that project)…BUT, the OAK hardwood floor underneath was/is in perfect condition!!
  • gut & re-do bathroom

Over the last few years, things that have gotten done list

  • had the chimney ducts replaced for the hot water heater and the furnace (the ducts that were replaced were terracotta and breaking causing very poor air movement)
  • cut down all the boxwood bushes along the front porch that looked like lolipops (one stick with a puff on top) and replaced with new ones
  • cut down the dead evergreen tree that was brown underneath from the dead with about an inch of green on top that made it look alive
  • replace shed (you should have seen the slanted, no door, rusted old shed that was taxed and insured as a “structure”)
  • replace back deck (if that’s what you want to call a 24″ wide boardwalk to 3 rickety steps)
  • replace french drain and sump pumps to go completely around the basement (this was a scam from a water-proofing company, because there is still a water issue (Hydrostatic Pressure)
  • had a real stairway installed to the attic, the pull down stairs would hang and sway without the terrific rigging that the previous owner had left me with (I may have went up those steps 5-10 times before I finally said that it was too dangerous)
  • basement – what I call the hotel room – carpet, drywall, furnish
  • basement – laundry room – floating flooring (it’s 3’x1′ tiles that seal to each other that sits on top of the existing flooring
  • basement – what I want to be the game room – there has been a water issue in the basement that has prevented me from doing what I want down there, but I have a plan in the works
  • one of the best things, so far, that has been done is the fireplace insert, before it, if one door was open on the fireplace and the other was not, the house would slowly fill up with smoke and as much as I love the smell of a fireplace, this was not ideal for heat, romance or a bear skin rug. So on one of our trips to New Hampshire, we stopped at a Vermont Casting Dealer and got a great deal on a discontinued model. Getting it in my car wasn’t a problem, they used a crane…but getting it out, well lets just say I drove around with it in the back of the SUV for a few days. There is a long story to the installing of this insert but I think I will leave that for another post. Once it was installed, there was new duct work through the chimney so it felt very safe burning wood even when we were not home…I have had to run the fan on the lowest setting for most of the ongoing fires, because it would get so warm that I would feel the need to sit outside.
  • with the insert installed, we had the outside chimney re-cemented and re-stucco, they did a great job on this, but had my budget been a little bigger for this project, I would have went with the stone-face…but like I said, I am really happy with the work that was done

Categories: Around the House